Klevgrand Richter – simple and effective dynamics control for podcasters (and more)
August 31, 2023
Here is another quick gear review covering my current favourite compressor for podcast dialogue levelling: Richter by Stockholm based developer Klevgrand.
Disclaimer: I have no association with any manufacturers, and all software was purchased with my own funds.
Klevgrand describe themselves as a music software company and creative studio. I first came across their products a few years ago while researching unusual spatial effects for a film mix. I ended up using Haaze (a multi-band spatializer designed for creative processing of mono sources) and Røverb (a delay effect with up to 50 individually controllable delay lines) on that project, and since then I’ve kept an eye on their plugin offerings.
While the majority of Klevgrand’s products are geared towards music production, their early company history mentions film production. Perhaps this wide base of experience has contributed to Richter’s effectiveness in my primary post production use case – dialogue compression.
We all have our favourite compressors, and Richter joins a saturated* plugin market containing innumerable offerings. I imagine most audio professionals working in post production favour clean, controllable and utilitarian compression. My most commonly used compressors are probably FabFilter Pro-C and Izotope Neutron Compressor – both versatile processors offering precise control – and for when I want a bit more personality, oldTimer and FETpressor from PSP Audioware.
But although I have my usual suspects ready to go in my mix template, I can’t resist the temptation to throw a demo of a new compressor on some dialogue to see what it can do.
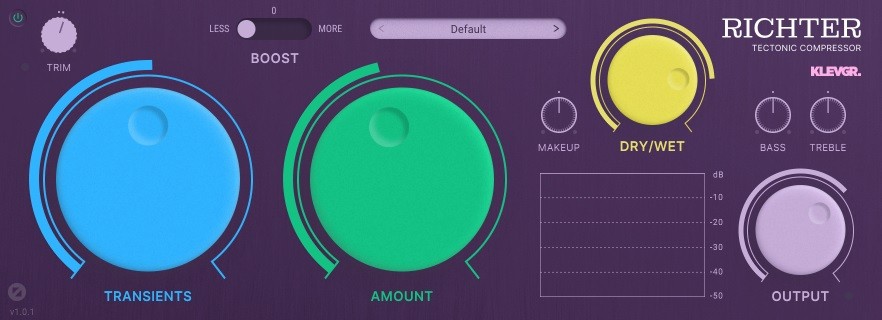
At its heart Richter offers robust yet highly transparent compression based around an interestingly designed algorithm. Instead of conventional attack and release controls, Richter presents the user with a single “TRANSIENT” knob which, according to the user manual, “controls how the internal envelope follower will react to transients vs continuous/lasting sounds”.
This approach results in a compression style which responds very naturally to the source, and seems particularly well suited for dialogue, with lots of dynamic control on offer with very few audible artefacts. That’s not to say it’s subtle – nor should you expect subtlety from a self identified “tectonic compressor” – but I find I can achieve fairly heavy compression in a way that doesn’t fatigue my ear in the way more conventional compressors can. With that said, tasteful moderation is the key to achieving control rather than signal annihilation!
Keeping the "TRANSIENT" control dialled before the 12 o' clock position results in a faster sounding compression, with a correspondingly slower response right of 12 o' clock. However, reflecting the intuitive design philosophy of the plugin, I often find myself enjoying the results of leaving the transient control in its default 12 o' clock position.
Threshold is controlled by the “AMOUNT” knob, which I find myself setting usually anywhere between about 30 and 50%. The “BOOST” control adjusts the overall range of the “AMOUNT” knob, with gentler adjustments possible when switched to LESS. The “DRY/WET” knob allows you to easily blend in some of the original, unprocessed signal, and this is a common strategy to restore a bit of transparency when using heavier compression.
The interface is simple, with the most important controls taking up the largest amount of space. There is also an informative visualization graph showing the amount of attenuation, and of particular interest, the internal side chain signal. Paying attention to this side chain display while adjusting the "TRANSIENT" knob gives you a good sense of what elements of the incoming signal the compressor is reacting to.
So why would I recommend Richter for podcasters? First of all, it’s very easy to use – you could get away with using it as almost a “one knob” compressor by dialling in the “AMOUNT” knob to taste, then (if needed) adjusting the “TRANSIENT” knob to suit the source. Second, the transient based detection adapts particularly well to voice, and takes the guesswork out of attack and release controls for the less technically-minded podcaster. Third, the combination of bold yet non-fatiguing dynamic control that Richter offers takes away a lot of the heavy lifting when aiming for a specific loudness (LUFS) value for podcast platforms.
Klevgrand have some unique takes on conventional audio processors on offer, and I wouldn’t be surprised if at some point they combine some of their technologies into a podcast specific tool. In the meantime podcasters should also investigate the noise reduction capabilities of Brusfri and the Esspresso de-esser.
* if you stopped reading at this pun I wouldn’t blame you.
Recording room tones with the RØDE NT1 5th Generation
March 7, 2023

I thought I would share some thoughts on a new recording rig I'm putting together specially to record room tones and other very quiet sounds, based around a pair of the new RØDE NT1 5th Generation microphones.
You may want to skip below to my quick, unscientific, and unglamorous example recording with a pair of the new NT1s recorded at 96k 32bit float, compared with a pair of Schoeps MK4 recorded at 96k 24bit:
Disclaimer: I have no association with any manufacturers, and all equipment was purchased with my own funds. No freebies for me unfortunately.
With my career having lately made the shift to sound editing for TV, I've been working steadily to build my own library of FX recordings. The humble room tone—the sound of a space with no specific action occurring—is a sound editor's staple for tying together convincing atmos and background tracks. Although a well chosen room tone provides a backdrop for other elements of the soundtrack, it's easy to build up a noticeable amount of unwanted noise and hiss when layering multiple room tones and ambient recordings.
As part of developing my own recording practice, I've been curious about building a rig optimized to record very quiet sounds. Researching microphones with ultra-low self noise led me to two candidates: the RØDE NT1, and the Lewitt LCT 540 S, both of which advertise self noise figures in the region of 4dB (A weighted). The way different microphone manufacturers list signal to noise and self noise performance varies to the extent that it makes it difficult to draw conclusions from data sheets alone.
Around the same time I was researching microphones, I came across an interview over at A Sound Effect with Pasi Pitkänen of PPSFX. In the article he describes building a custom ORTF stereo microphone using the capsules and preamps from two Rode NT1s. I realized that this must have been the rig used to record his excellent Office Space library, which I use regularly due to its notable absence of hiss, and abundance of useful noise.
Having a reference now for the results possible with a low noise recording rig based around the NT1, the release of RØDE's NT1 5th generation caught my eye for its advertised ability to record directly via USB at 32 bit floating point resolution. The capability of the mic to perform its own A/D conversion, thus bypassing the need for an additional preamp stage, suggested a potential advantage for recording very quiet sound sources on top of its already established standout self noise performance.
The idea of a microphone which can digitize the signal at the point of capture at a high bit depth isn't new—Neumann's recently discontinued Solution-D being an obvious high performance example. But it's interesting to note that this technology—formerly the domain of cost-as-no-object audiophile recording—might have found its niche in "unclippable", affordable, general purposes microphones.
The capability of the NT1 5th Generation to record in 32 bit floating point isn't really an imperative for ultra-low noise recording, but it does imply that the A/D conversion is happening at a high enough resolution that even extreme gain adjustments can be made later without worrying about bringing up unwanted low level noise. It also gives essentially unlimited headroom for the unexpected sonic events that are part and parcel of FX recording.
While I've previously eschewed USB microphones as being inferior to their three-pronged counterparts, the NT1 5th Generation has another trick up its sleeve courtesy of RODE's patent-pending Dual Connect output. This means it can be operated either as a USB mic, or conventionally via XLR into a preamp. In addition to being versatile and convenient, this also effectively future-proofs the mic: while USB is backwards compatible by design, driver and operating system support aren't infinite, so the Dual Connect feature provides some assurance that you will be able to record with the NT1 many years into the future.
Setting up the NT1s
My pair of NT1s arrived this last weekend and was able to get them set up quickly with my 2020 M1 MacBook Air. Needless to say, it's essential to have a fanless computer if you plan to record extremely quiet sources. As the MacBook Air only has two USB 3 ports, I also used an Anker powered hub so I could avail of plug-in power. In the future I will experiment with running the setup off battery only.
Using both microphones via USB means you're effectively running multiple audio devices on a single system, so I created an Aggregate Device to allow the mics to be recorded as a stereo pair. To keep things simple I plan to monitor while recording using the Mac's headphone output, so I added External Headphones to the same Aggregate Device. The result is a virtual audio device with a 2 channel input and output that can be selected in the DAW, in my case REAPER.
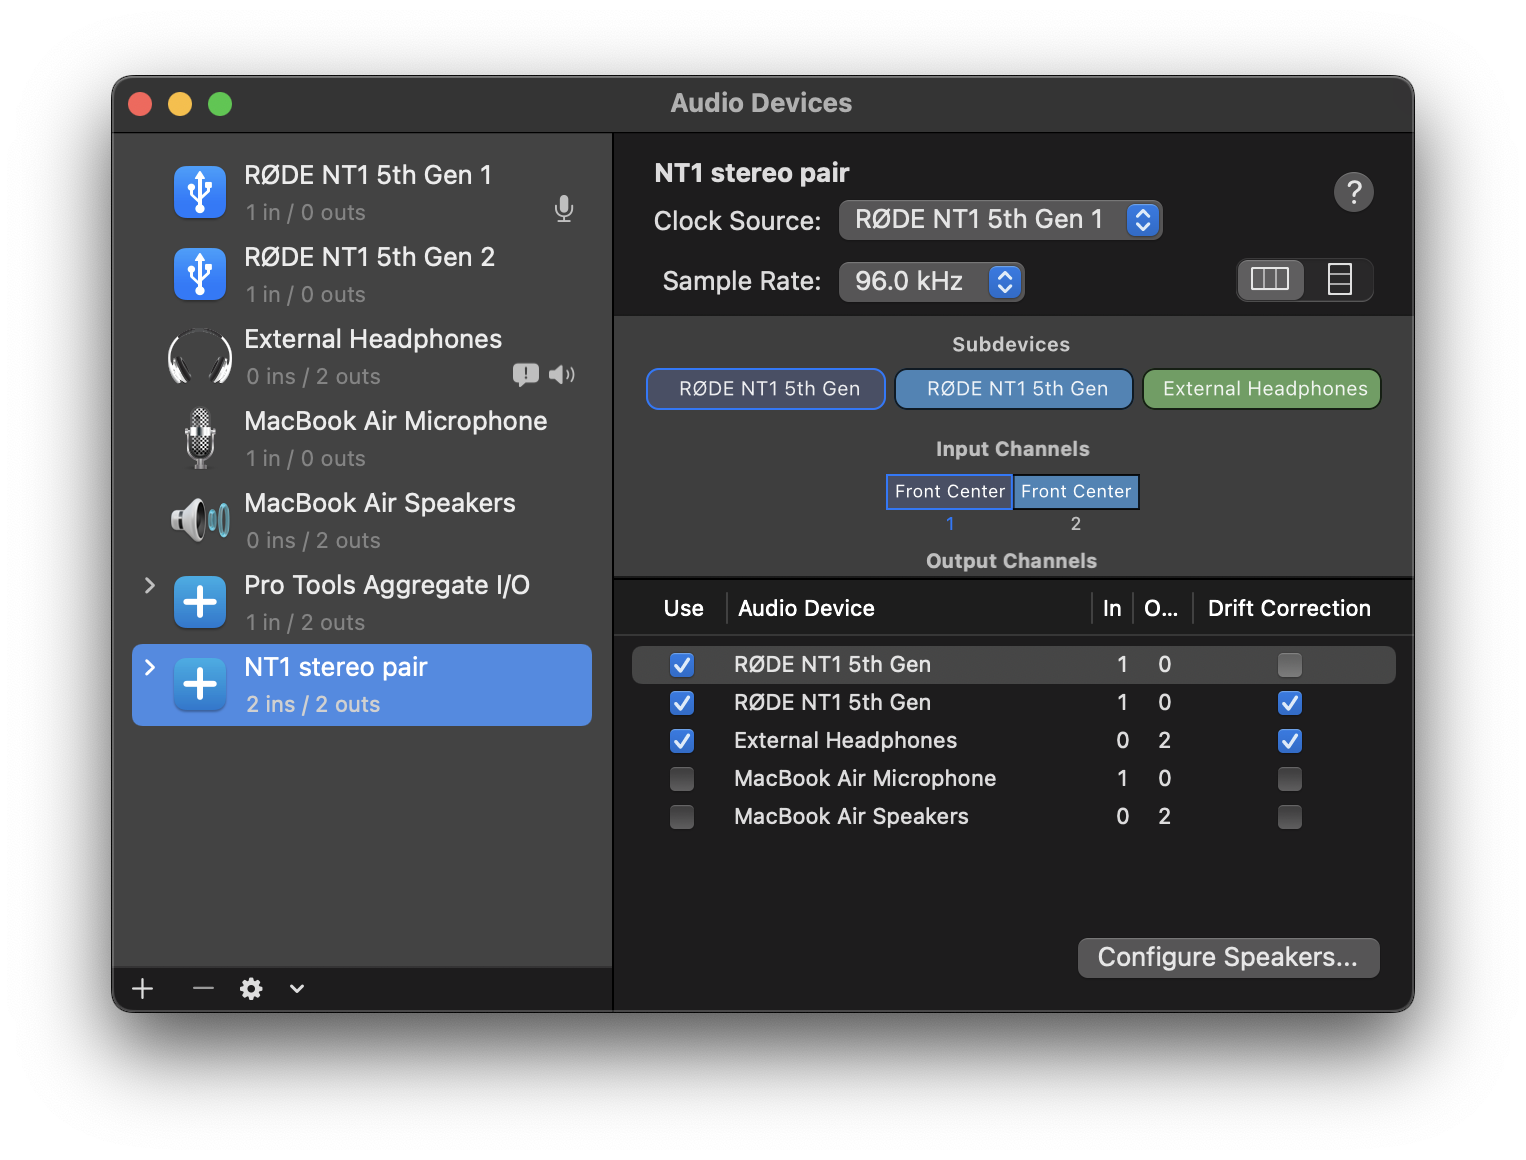
Another avenue for further investigation is the effectiveness of Core Audio's Drift Correction. As each microphone's A/D conversion is happening internally, both microphones are operating off their own clocks, and so small timing inaccuracies can creep in which affect synchronization. The job of the Drift Correction system is to keep the incoming USB audio streams synchronized, and so far it seems to work fine for me. As an aside, the spectrogram of the NT1 recording shows some variations happening above 40kHz, which a quick test (by deselecting Drift Correction on the second mic in the Aggregate Device) suggests is a by-product of Drift Correction doing its job.
Self noise comparison
My first test recording proved that the RODE NT1 5th Generation is an extremely quiet mic. But in order to get a sense for how quiet, I decided to test it against my go-to mics for FX recording, a pair of Schoeps Collette CMC6/MK4 (cardioid) small diaphragm condenser mics.
Before we go any further, I should mention that this is an inherently unfair comparison. The design trade-offs of small diaphragm condenser mics mean that they are at a disadvantage compared to their large diaphragm siblings in terms of achievable self noise performance. My justification for doing this comparison then is that I'm intimately familiar with the sound characteristics and technical performance of the Schoeps mics, so they represent a good reference point for me. In addition, I trust the accuracy of Schoeps' technical specifications (the MK4 capsule achieves 14dB self noise, A-weighted, according to the published specs), which further increases their value as a reference point.
To record the comparison I set up both pairs of mics in NOS configuration (30cm apart, angled out as 45 degrees) as close to each other as possible. While the NT1s ran into the MacBook Air via USB, the MK4 pair were recorded on my Sound Devices MixPre-3. I performed some rudimentary gain matching by playing a test tone in the room and setting the gain on the MixPre to roughly match the levels coming into REAPER from the NT1s. I then fine adjusted the levels of the MK4 pair after recording.
Results
As expected, the NT1s achieve excellent self noise performance compared to the MK4s. This is not to say that the noise present in the MK4s is a deal breaker—in fact, part of the reason the MK4s get such regular use is that even in an extreme recording situation like this, their noise signature is inoffensive, with no problematic weighting in specific frequency ranges.
The sound stage presented by the NT1s seems a little exaggerated to me, although this could be a result of hearing "further" into details that would otherwise be obscured by noise. The MK4s present what I consider to be a more realistic rendering of the space. This perception is likely down to capsule differences, with the Schoeps capsules being famous for their even rendering of off-axis sound.
In terms of frequency response, to my ears the NT1s present a lively, detailed sound, while the MK4s sound more neutral, but again I feel they are a bit closer to how things sounded in the room.
Potential disadvantages
Any time you record outside of a studio or other permanent setup, issues of portability and ease of handling become important, so I'll mention some initial observations with the NT1s.
As large diaphragm condenser mics go, the NT1s seem quite light weight, and they are not as large and bulky as a U87, for example. The included SM6 shock mount is solidly built and sturdy, but also on the heavy side, so care needs be taken when mounting two mics on a single stand for stereo recording. As they employ traditional elastic suspensions, I found myself taking my time while setting up, as I didn't fancy playing a game of cat's cradle to reassemble a shock mount of this design. For setup speed and lighter weight on the stand I will probably replace the RØDE shock mounts with something from Rycote's USM range.
The longevity of the proprietary Dual Connect output remains to be seen, but I was pleased to find that I didn't have to fiddle around much to the get the USB 3 cable attached once the mic was in its shock mount. Helpfully RØDE has bundled a good quality USB 3 cable of reasonable length with the mic, and the attachment was solid enough to inspire confidence that it won't become detached without provocation.
With that said, the question remains about the ability of a USB connector to withstand the inevitable knocks and bumps of life outside the studio. The absence of any way to lock the cable in place means care needs to be taken both at the microphone and computer end of the connection. In addition, I doubt that general purpose USB cables will have the same reliability and lifespan as conventional microphone cables (although I have a drawer full of USB cables of assorted vintages which would beg to differ!)
Conclusion
The RØDE NT1 5th Generation is an excellent choice for such a unique recording scenario, and I am sure they will become my room tone weapon of choice, as well as seeing further use as an all-round, general purpose FX recording mic.
The inclusion of a sturdy shock mount and a good quality USB 3 cable of sufficient length (not to mention a spare XLR cable) only sweetens the deal for these high performance, wallet friendly microphones.